Surely we've all experienced that "going crazy" feeling when Lightroom keeps stuttering, lagging, and freezing every time you drag a slider. When inspiration is flowing but the machine doesn't cooperate, it's truly frustrating. The computer specs aren't weak, the images aren't too heavy, so why is Lightroom so slow?
Don't rush to blame the computer or software. Lightroom, by nature, is a data management "monster." It's not just a simple photo editor, but also a massive library, a notebook that records every tiny change you make to your photos. Understanding how it works and cleaning it up properly will show you a world of difference.
This article isn't just theory, but experiences I've accumulated after many years of "struggling" with Lightroom. Let's roll up our sleeves and start "curing" Lightroom together!
Part 1: Clean Up Lightroom - Optimize Catalog and Data
Imagine Lightroom's Catalog as the "heart" and "brain" of the entire system. All information about images, from original file locations, editing parameters you've applied, to keywords, ratings... everything is stored here. A healthy "heart" will help the entire body function smoothly.
Golden Location for Catalog and Cache
This is the most important thing but many people overlook it. By default, Lightroom usually stores Catalog and Cache on the C drive (system drive). This is a mistake!
- Catalog: Move the
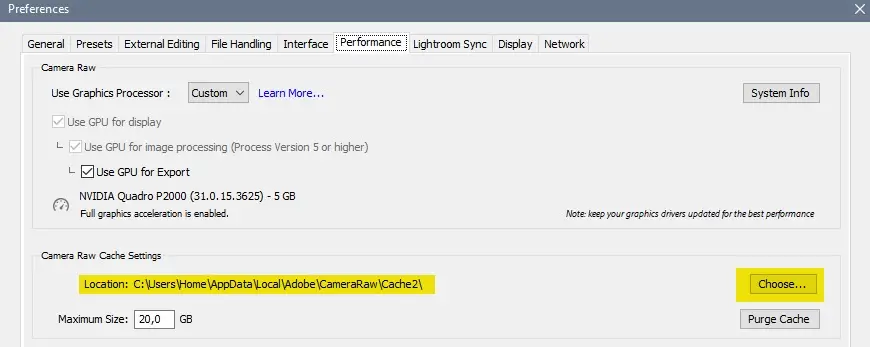
.lrcatCatalog file to the fastest drive you have, ideally an SSD drive. The fast read/write speed of SSD will help Lightroom access data almost instantly, significantly reducing image loading time and Library operations. - Camera Raw Cache: Similarly, increase the capacity and change the location for this cache. Go to
Edit > Preferences > File Handling(on Windows) orLightroom Classic > Preferences > File Handling(on Mac).- In the
Camera Raw Cache Settingssection, increaseMaximum Sizeto at least 20GB (or more if you have spare capacity). - Click
Chooseand select a folder on an SSD drive to store the Cache.
- In the
This is like moving your house from a small alley to a spacious boulevard - the speed difference will be clearly noticeable.
Regular Catalog Optimization
Over time, the Catalog file will become "messy" and fragmented. Lightroom has a built-in tool to clean it up.
Go to File > Optimize Catalog.... Lightroom will analyze and reorganize the database, making it work more efficiently. You should do this about once every week or two, or after importing a large batch of images.
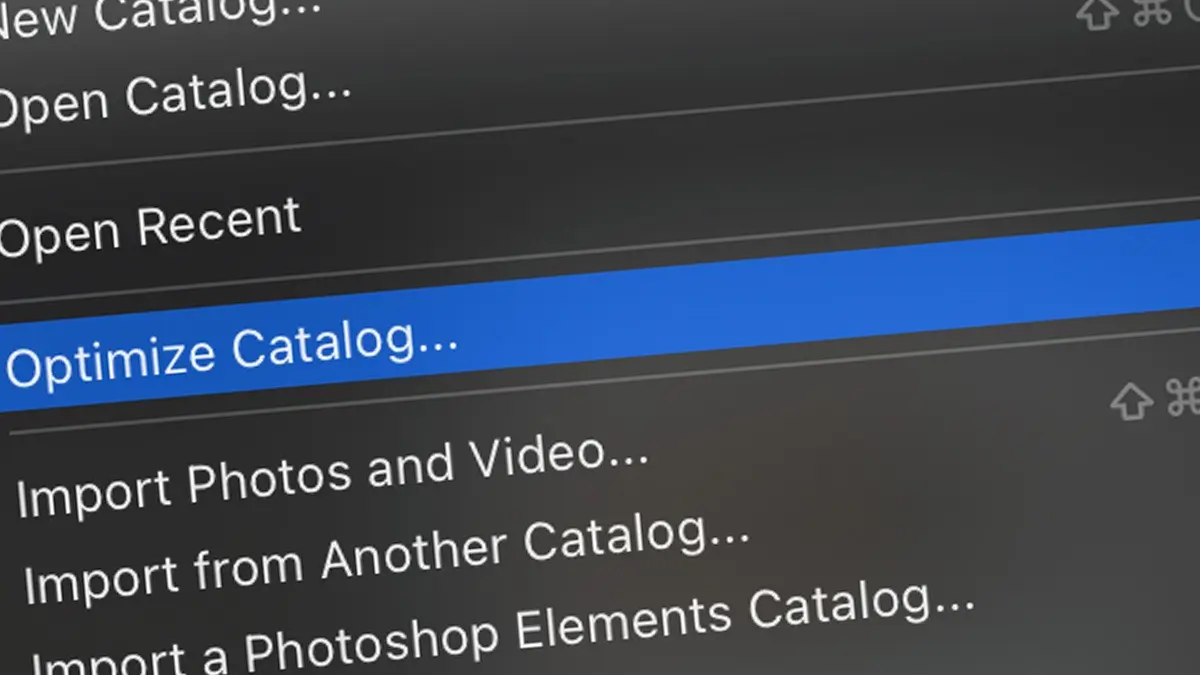
Don't worry, it won't affect your images or editing steps at all.
Split Catalogs - Should You or Shouldn't You?
Many people have the habit of creating a new Catalog for each project, each photo session. This approach has the advantage of keeping each Catalog always small, light, and fast. However, the downside is that you'll have difficulty finding old images when needed because they're scattered in many places.
- When should you split Catalogs? If you work on separate projects (wedding photography, events...) and rarely need to find images from different projects, this is a good choice.
- When should you use one large Catalog? If you want to manage your entire photo library in one place for easy searching and comparison, then stay loyal to one master Catalog.
If using one large Catalog, make sure you implement the two tips mentioned above well.
Part 2: Make Lightroom Run Faster - Performance Tuning
After having a solid foundation, now it's time to fine-tune Lightroom to unleash its full power.
Smart Previews - The Speed "Companion"
This is the golden key to speed up the Develop module. Smart Previews are high-quality preview files but with very light file sizes (DNG format), created from your original RAW files.
- How to create: When importing images, in the right control panel, check the
Build Smart Previewsbox. - How to use: Go to
Edit > Preferences > Performance. Check theUse Smart Previews instead of Originals for image editingbox.
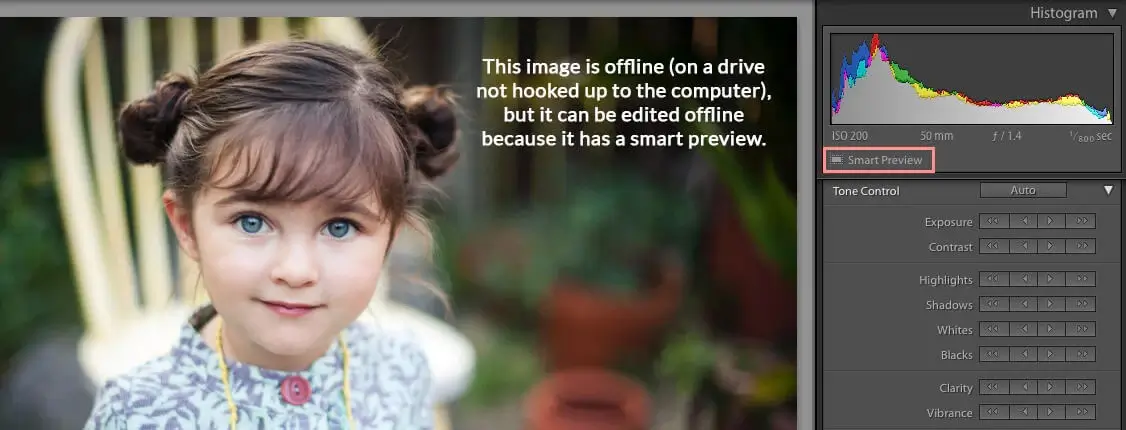
When this option is enabled, when you edit in the Develop module, Lightroom will work on the super-light Smart Preview file instead of having to process the heavy original RAW file. All operations like color adjustments, exposure, applying presets... will be surprisingly smooth. When you export images, Lightroom will automatically apply those changes to the original file to produce the highest quality.
Leverage Graphics Card Power
Most modern computers have graphics cards (GPU). Let it shoulder some of the work for the processor (CPU).
Go to Edit > Preferences > Performance. In the Use Graphics Processor section, select Auto. Lightroom will automatically determine if your GPU is powerful enough to support it. Enabling GPU will help tasks like image zooming, rotation, and display on high-resolution screens (4K, 5K) become smoother.
Understanding Different Preview Types
When importing images, Lightroom asks what type of Build Previews you want. This directly affects your working speed later.
- Minimal: Fastest when importing, but when you switch to viewing individual images, Lightroom will have to render again, causing delays.
- Embedded & Sidecar: Uses existing JPEG previews in RAW files. Fast, but quality isn't high.
- Standard: Lightroom creates previews sized appropriately for your screen. This is a balanced choice, good for most people.
- 1:1: Takes the most time when importing and uses the most hard drive space. However, it creates previews with full resolution. The benefit is that when you zoom 100% to check sharpness, the image will appear immediately without waiting.
Advice: Choose Standard when importing. Then, when you need to check sharpness of a batch of images, select them all, go to Library > Previews > Build 1:1 Previews and go make a cup of coffee. When done, zoom checking for sharpness will be super fast.
Turn Off Unnecessary Features
If you don't use the features below, turn them off to free up resources.
- Face Recognition: This feature runs continuously in the background to scan images. If not needed, click the small face icon in the bottom toolbar and pause it.
- Sync with Lightroom CC: If you only use Lightroom Classic and don't sync with the mobile version, pause synchronization in the top left corner.
Part 3: Optimize Workflow (Smart Workflow)
Good tools with non-optimized methods are like having nothing.

Logical Editing Order
Perform overall edits first, detailed and heavy edits later. A logical workflow would be:
- Basic editing: White balance, exposure, contrast, crop, rotate images.
- Color editing: Use HSL, Color Grading.
- Local editing: Use Brush, Radial Filter, Gradient Filter.
- Heavy tasks: Noise reduction, sharpening, and effects in the Effects section. Do these steps last, as they consume a lot of resources.
Don't Overlook "Auto Advance" Feature
When you're culling images by flagging or rating with stars, press the Caps Lock key. After you press a key to rate (e.g., P for Pick), Lightroom will automatically move to the next image. This saves thousands of mouse clicks and precious time.
Conclusion
Optimizing Lightroom isn't a one-time job. It's a habit. By applying the tips above, you're not only helping Lightroom run faster but also building yourself a professional, efficient workflow.
Remember, the ultimate goal is for technology to serve our creativity, not the other way around. Wishing everyone smooth photo editing sessions without frustration from "turtle-speed" software anymore!

![How to Optimize iPhone Photos: Capture & Edit Stunning Pictures [2025]](/images/blog/optimized-images-on-iphone.webp)